分子对接(Molecular Docking)理论
所谓分子对接就是两个或多个分子之间通过几何匹配和能量匹配相互识别找到最佳匹配模式的过程。分子对接对酶学研究和药物设计中有重要的应用意义。
分子对接计算是在受体活性位点区域通过空间结构互补和能量最小化原则来搜寻配体与受体是否能产生相互作用以及它们之间的最佳结合模式。分子对接的思想起源于Fisher E的”钥匙和锁模型”,主要强调的是空间形状的匹配。但配体和受体的识别要比这个模型更加复杂。首先,配体和受体在对接过程中会由于相互适应而产生构象的变化。其次,分子对接还要求能量匹配,对接过程中结合自由能的变化决定了两个分子是否能够结合以及结合的强度。
1958年D.E.Koshland提出分子识别过程中的诱导契合概念,受体分子活性中心的结构原本并非与底物完全吻合,但其是柔软和可塑的。当配体与受体相遇时,可诱导受体构象发生相应的变化,从而便于他们的结合进而引起相应的反应。
分子对接方法根据不同的简化程度分为三类:刚性对接、半柔性对接和柔性对接。刚性对接指在对接过程中,受体和配体的构象不发生变化,适合研究比较大的体系如蛋白-蛋白之间以及蛋白-核酸之间,计算简单,主要考虑对象之间的契合程度。半柔性对接常用于小分子和大分子的对接,在对接过程中,小分子的构象可以在一定范围内变化,但大分子是刚性的。这样既可以在一定程度上考察柔性的影响,又能保持较高的计算效率。在药物设计和虚拟筛选过程中一般采用半柔性的分子对接方法。柔性对接方法一般用于精确研究分子之间的识别情况,由于允许对接体系的构象变化,可以提高对接准确性但耗时较长。
分子对接的目的是找到底物分子和受体分子最佳结合位置及其结合强度,最终可以获得配体和受体的结合构象,但这样的构象可以有很多,一般认为自由能最小的构象存在的概率最高。搜寻最佳构象就要用到构象搜索方法,常用的有系统搜索法和非系统搜索法。系统搜索法通过改变每个扭转角评估所有可能的结合构象,进而选取能量最低的。这一方法计算量非常大。因此通常使用非系统搜索法来寻找能量较低构象,常用方法有:分子动力学方法、随机搜索、遗传算法、距离几何算法等。随机搜索又包括完全随机算法、蒙特卡罗法和模拟退火法等。
AutoDock Vina是The Scripp Research Institute的Olson科研小组开发的分子对接软件包,使用拉马克遗传算法提高效率。软件把遗传算法和局部搜索结合在一起,遗传算法用于全局搜索,而局部搜索用于能量优化。为了加快计算速度,AutoDock Vina采用格点(grid)计算。首先在受体活性氨基酸附近划定一个长方体区域作为搜索空间,扫描不同类型的原子计算格点能量,在搜索空间内,调整配体的构象、位置和方向,进而评分、排序获得能量最低的构象作为输出结果。
对范德华相互作用的计算:每个格点上保存的范德华能量的值的数目与要对接的配体上的原子类型数目相同。如果一个配体中含有C、H、O三种原子类型,那么每个葛店需要用单个探针原子与来计算其与受体之间的范德华相互作用值。当配体与受体进行分子对接时,配体中某个原子和受体之间的相互作用能通过周围8个格点上的这种原子类型为探针的格点值用内插法得到。
静电相互作用的计算采用静电势格点。当配体与受体对接时,某个原子和受体之间的静电相互作用能通过周围格点上静电势以及原子上的部分电荷计算得到。
蛋白和小分子可视化
例子文件是一个分辨率为2艾的X-射线衍射晶体结构(PDB ID: 1HSG),其为HIV-1蛋白酶与药物茚地那韦(indinavir)结合在一起的构象。软件PyMOL用来观察HIV-蛋白酶、结合位点和药物分子的结构。
显示蛋白结构并做样式处理
-
下载HIV-1蛋白酶的PDB结构(https://files.rcsb.org/download/1HSG.pdb),存储到一个不含中文和空格的目录下。
-
启动PyMOL,依次点选
File-Open-1hsg.pdb导入PDB文件,会看到如下界面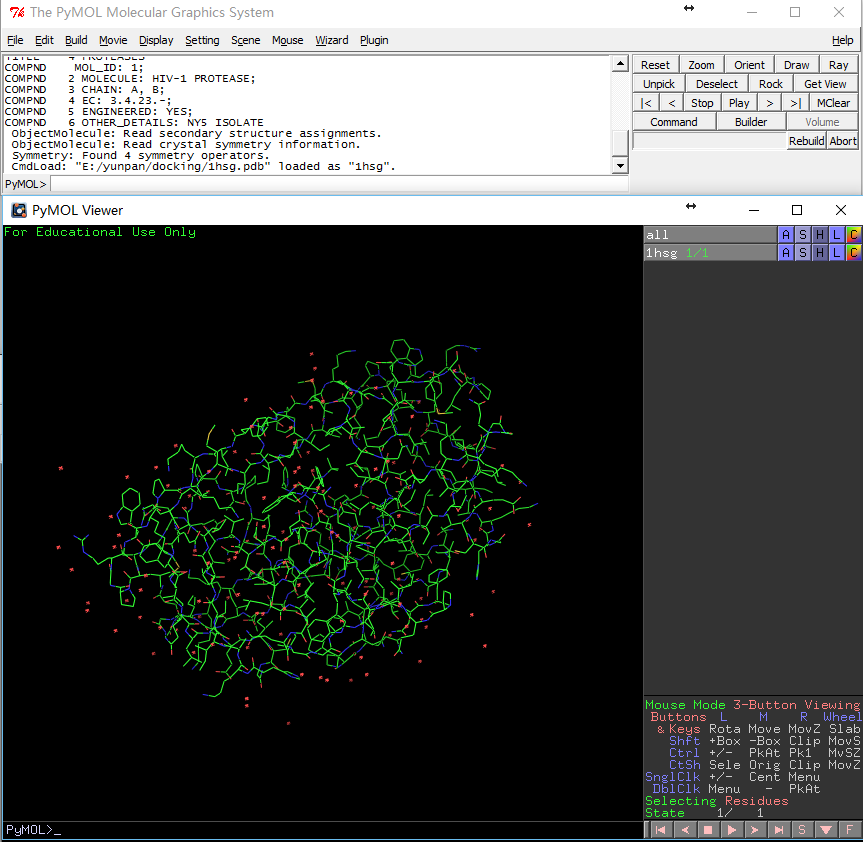
-
首先在右侧的对象控制面板,依次点选
行all的H列-Hide: everything(如左图所示),然后浩瀚无际的没有月亮的夜空出现在我们面前。 -
在右侧的对象控制面板,依次点选
行1hsg的S列-Show: cartoon,然后点选C列-By chain显色,这时可以看到如右图所示的同源二聚体。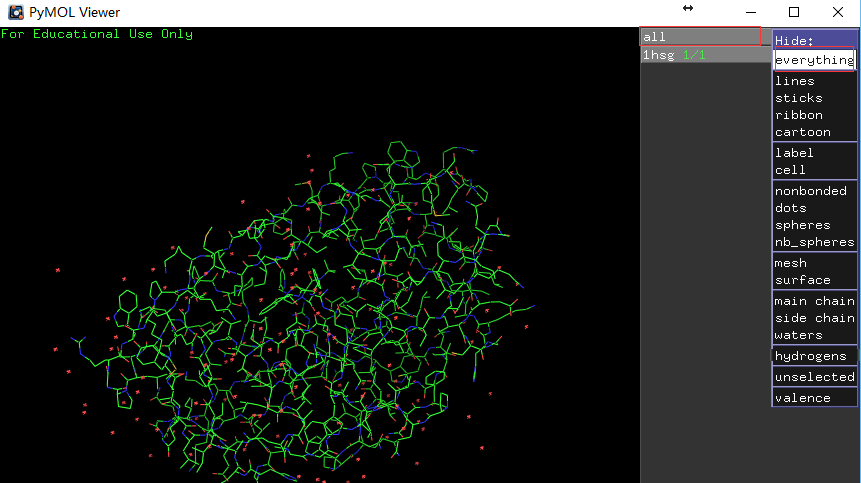
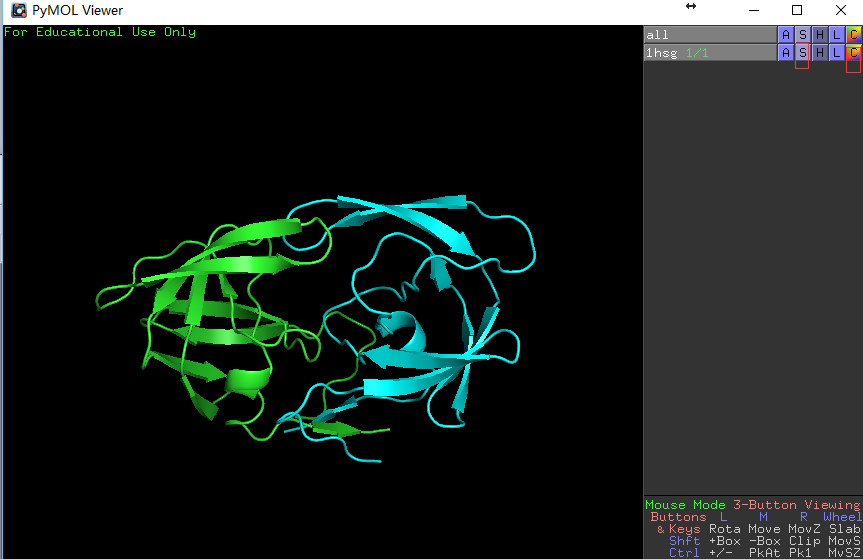
左图展示对象控制面板,右图展示蛋白同源二聚体。
显示与蛋白结合的小分子化合物和水分子
-
从蛋白结构的PDB文件(PDB文件格式解析见后面)或PDB官网的信息(如下图所示)可以看到,
1hsg结构中包含配体药物indinavir,其残基的名字为MK1。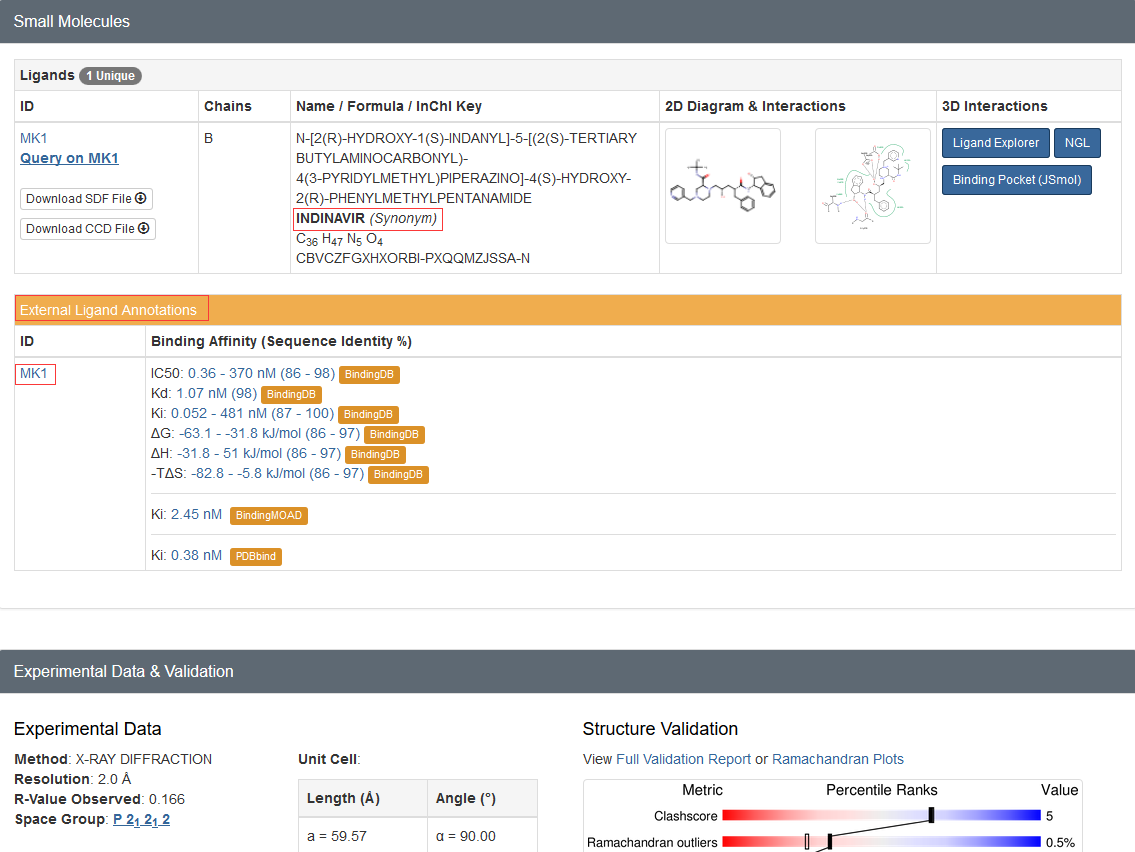
-
在PyMOL的命令行处输入
PyMOL> select indinavir, resn MK1,回车,会看到 如下画面变化。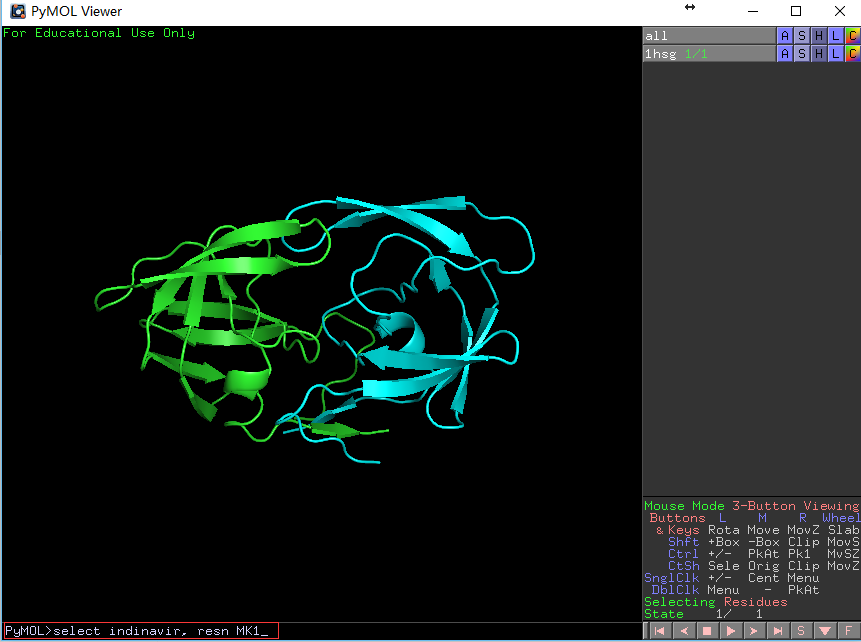
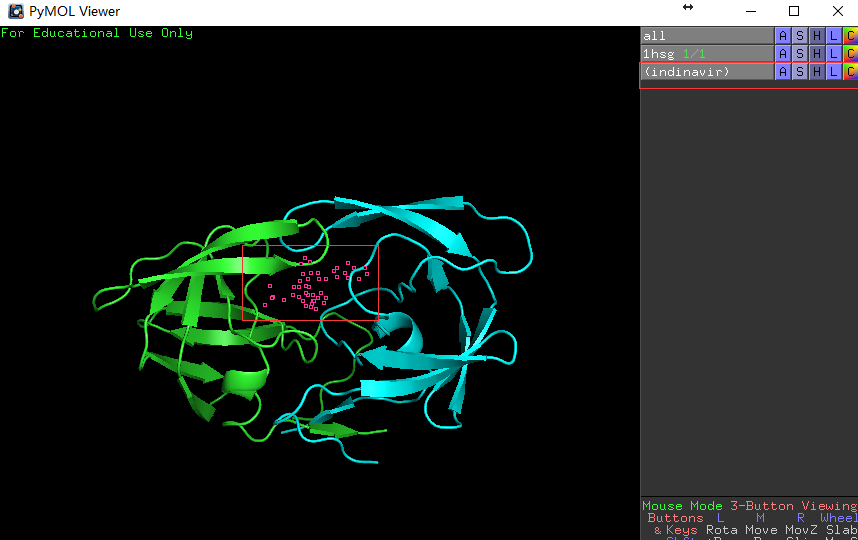
左图展示输入的命令和输入命令前的结构图,右图展示输入命令后的结构图,药物分子的结构呈被选定状态(红色空心块)。 -
在右侧的对象控制面板,依次点选
行indinavir的S列-Show stick,再点选C列选择一种不同的颜色。在屏幕无图处点击鼠标,取消小分子药物的选择状态。这时可以清晰的看到小分子的结构和空间位置(如下左图),随意拖动鼠标旋转或放大查看药物分子与蛋白的结合方式。PyMOL鼠标操作:按住左键移动旋转,按住右键移动放大,按住中键移动,观察结合位点所在的位置;滚动滚轮调节景深,化学结构会以 溶解形式出现。 -
显示水分子。水分子的残基名字为
HOH,运行命令PyMOL> select H2O, resn HOH调出水分子。然后点选S-Show spheres,C-red。再运行PyMOL> set sphere_scale, 0.2设置水球的大小。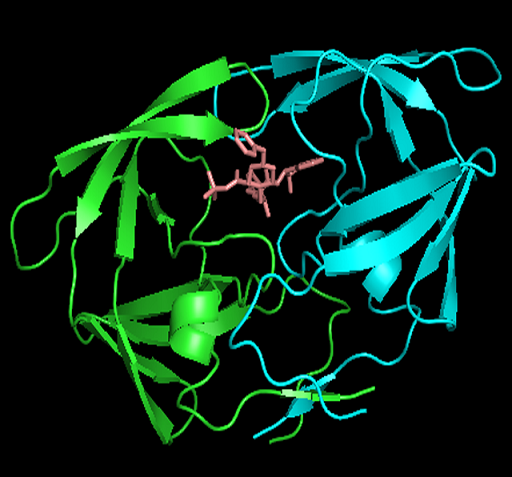
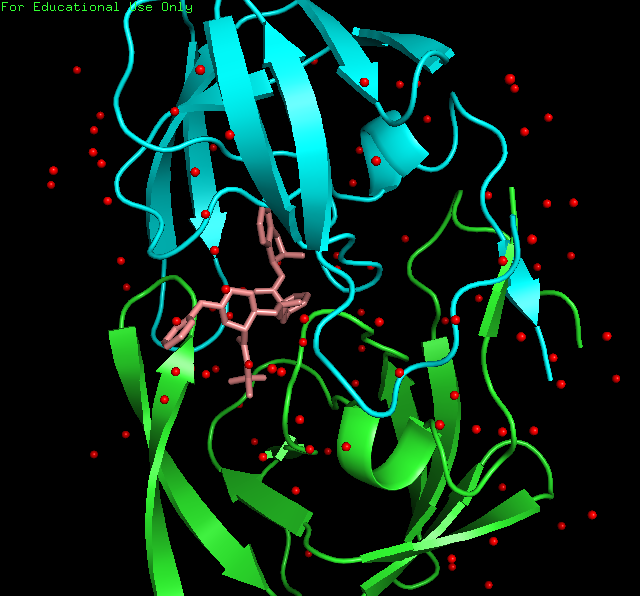
左图小分子的结构图及其与蛋白的结合位点,右图展示蛋白、小分子、水分子(红色圆球)的空间构象。 -
如果要存储结果,则在命令行输入
png E:/docking/1shg.png保存当前结果。
准备docking需要的受体(蛋白)和配体(化合物)
Docking算法需要每个原子带有电荷并且需要标记原子的属性。这些信息通常未包含在PDB文件中。我们需要在对蛋白和小分子的PDB文件预处理,生成PDBQT文件同时包含以上信息和PDB文件中的原子坐标信息。进一步地对于“柔性配体docking”,我们还需要定义配体的柔性部分和刚性部分。所有这些都可以通过软件AutoDock Tools (adt)来完成。
Docking algorithms require each atom to have a charge and an atom type that describes its properties. However, the PDB structure lacks these. So, we have to prep the protein and ligand files to include these values along with the atomic coordinates. Furthermore, for flexible ligand docking, we should also define ligand bonds that are rotatable. All this will be done in a tool called AutoDock Tools (adt).
准备受体蛋白
-
PDB文件(1hsg.pdb)中包含了蛋白、配体和水分子;首先提取出蛋白的坐标,即以关键字
ATOM和TER开头的行 (具体解释和例子见后面PDB格式解析)存储到文件1hsg_prot.pdb。- 在windows下,我们可以手动选择,或者利用Excel的筛选功能。
- 在Linux下,使用命令
egrep "^(ATOM|TER)" 1hsg.pdb >1hsg_prot.pdb。
-
启动AutoDockTools
- windows直接双击图标就可
- Linux可以使用命令
adt &
-
依次点选
File-Read Molecule-1hsg_prot.pdb加载蛋白分子。- ADT中按住左键拖动旋转分子结构;点击中键滚动缩放;按住右键移动晶体位置。
-
更改展示方式:依次点选
Color-By Atom Type-All Geometries-OK。 -
加氢:晶体结构中通常缺少氢原子的坐标 (因为氢原子电子少,且质子核对电子吸引能力弱,因此很难定位,具体见http://www.uh.edu/~chembi/ChemSocRev_Jones_critical.pdf)。但是在docking过程中,氢原子尤其是极性氢原子对计算静电作用是必须的。因此我们需要给蛋白加上氢原子,依次点选
Edit-Hydrogen-Add-Polar only-OK(之所以选择Polar only是因为vina的官方视频里面是这么选择的,后面我们会做一个测试,最终会证明这个地方是不是选极性氢对最终结果没有影响)。这时氢原子会以白色短线形式出现。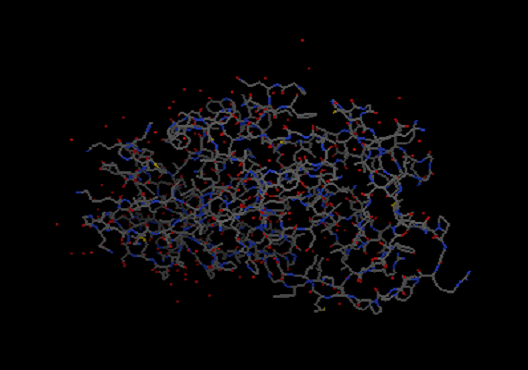
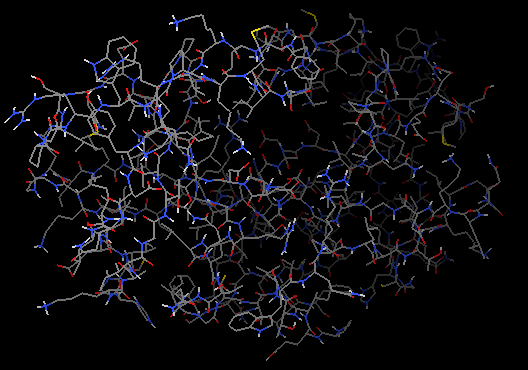
增加氢原子前(左)和后(右)蛋白结构显示 -
存储对蛋白的每个原子所做的修改和原子类型判断:依次点选
Grid-Macromolecule-Choose-1HSG_protein-Slect Molecule。ADT会弹出一个信息框包含程序所做的处理,比如合并非极性氢原子,计算原子局部电荷和判断原子类型,并提示保存Save-1hsg_prot.pdbqt。打开文件,查看最后两列,分别为每个原子的电量和类型 (详见后面PDBQT文件格式解析)。1hsg_prot.pdbqt为只加了极性氢的结果-
1hsg_prot_all_h.pdbqt为加了所有氢的结果这两个文件只在原子电量部分有所不同,经测试发现这两种处理对docking的结果没有影响,最后输出的日志文件和结果文件相同。
-
在受体蛋白定义配体结合的3D搜索空间: 如果我们事先不知道结合位点,理论上可以定义一个长方体盒子包含整个蛋白或者随便一个特定区域 (下文PDB文件解析中会提到PDB文件中有时会包含活性位点信息)。
依次点选
Grid-Grid box将会在蛋白上画出一个长方体,并且有一个弹出框。在弹出框中,拖拽刻度线查看长方体的变化,完成设置。在这个例子中,我们知道结合位点,就选取以其为中心的一个小空间。设置Spacing (angstrom)为1埃 (这实际是一个换算系数, 相当于步长; 默认为0.375,是C-C单键长度的1/4,最大为1。spacing值与(各个维度上的点的数目+1)的乘机就是长方体Grid box的大小)。在我们调整的过程中,可以看到随着这个数值的变大,立方体也被放大了。另外我们设置x,y,z center为16,25,4,number of points in (x,y,z)-dimension为30,30,30(最大为126,必须为偶数,AutoDock会自动再每一维再加一个点)。记下我们设置的这些点,下面会用到。在刻度转盘处点击右键会弹出一个窗口,输入数字回车即可设置GRID的中心坐标和大小。较大的
number of points in (xyz)-dimension和较小的Spacing会增加搜索的精度,同时需要花费更多的计算时间。 -
设置受体的柔性残基:在ADT中依次点选
Flexible Residues-Input-Choose Macromolecule-1hsg_prot;select-select from string-Residue: ARG8-Add-Dismiss, 8号ARG氨基酸残基就被选中了。再依次点选
Flexible Residues-Choose Torsions in Currently Selected Residues将选择的残基标记为柔性残基并设置可扭转的数量。在分子显示窗口中分别点击两个残基上CA和CB原子之间的建,使之变为非扭转的(紫色显示),这样两个残基中的32个键中有6个是可扭转的。这里设置配体的柔性残基或者使CA-CB的键为刚性都是可选操作。放在教程中只是用来展示怎么操作的,无其它指导意义。Flexible Residues-Output-Save Flexible PDBQT保存柔性残基文件。Flexible Residues-Output-Save Rigid PDBQT保存柔性残基文件。 -
关掉
grid和删除protein:Grid Options-File-Close w/out saving;Edit-Delete-Delete Molecule-1hsg_prot-Continue。
准备配体
-
与蛋白结构类似,配体的结构也缺少氢原子,我们需要添加氢原子并且定义哪些键是可以旋转的以用于柔性docking。
-
从PDB结构中提取配体的原子位置。
indinavir的配体残基名字为MK1,以HETATM开头的行表示非核心多聚体的成分 (heteroatoms)(具体见PDB文件格式解释)。- Linux系统下,运行
grep "^HETATM.*MK1" 1hsg.pdb >indinavir.pdb - Windows系统下,直接拷贝到文件
indinavir.pdb
- Linux系统下,运行
-
将结构读入ADT;依次点选
File-Read Molecule-indinavir.pdb;Color-By Atom Type-All Geometreies-OK。 -
晶体结构中通常缺少氢原子 (因为氢原子电子少,且质子核对电子吸引能力弱,因此很难定位,具体见http://www.uh.edu/~chembi/ChemSocRev_Jones_critical.pdf)。但是在docking过程中,氢原子,尤其是极性氢原子对计算静电作用是必须的。因此我们需要给配体加上氢原子,
Edit-Hydrogen-Add-Polar only-OK(之所以选择Polar only是因为vina的官方视频里面是这么选择的)。这时氢原子会以白色短线形式出现。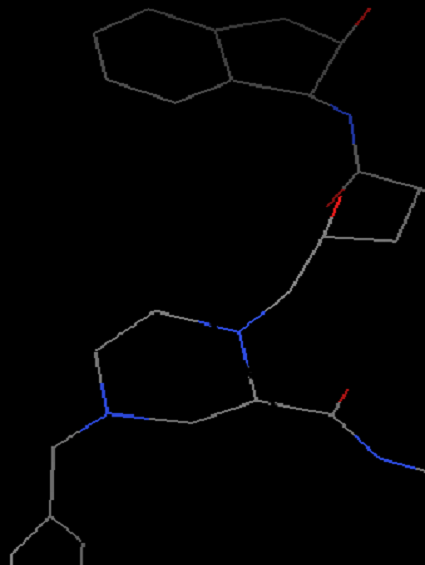
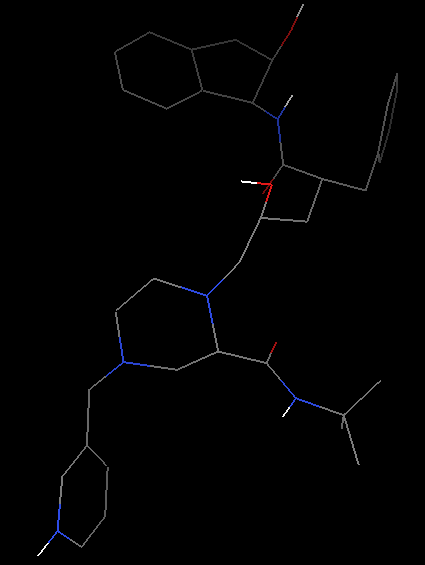
增加氢原子前(左)和后(右)化合物结构显示 -
在ADT中定义此化合物为配体,以便ADT为其计算局部电荷(partial charges)和设置可旋转配体键。依次点选
Ligand-input-Choose-indinavir-Select Molecule for AutoDock4。这时会有一个弹出框显示ADT所做的操作,包括合并非极性氢(只在添加了的情况下)、计算电荷电量和设置旋转键。然后点选Ligand-Output-Save as PDBQT存储结果。indinavir.pdbqt为只加了极性氢的结果indinavir_all_h.pdbqt为加了所以氢的结果
-
查看ADT检测出的旋转键,依次点选
Ligand-Torsion Tree-Choose Torsions,可以看到Number of rotatable bonds=14/32。
准备docking配置文件
docking配置文件包含了输入的受体(蛋白)、配体(化合物)和搜索参数的信息,为一个文本文件,名字任意,可以为conf.txt,内容如下
receptor = 1hsg_prot.pdbqt
ligand   = indinavir.pdbqt
num_modes = 50
out = dockingResult.pdbqt
log = docking.log
center_x = 16
center_y = 25
center_z = 4
size_x = 30
size_y = 30
size_z = 30
seed = 2009
- receptor和ligand为输入文件的名字,与conf.txt在同一目录下; out为输出文件的名字;log为输出日志文件的名字。
- centerhe和size定义搜索空间的位置和大小。
- num_modes设置最多显示的结合模型,鉴于只输出符合能量值要求的结果,最后输出的结合模型数量可能少于这一数值。
- seed设置随机数生成的种子,可以为任意整数。如果想重现之前的分析结果就需要使用相同的seed。
Docking 小分子化合物indinavir到HIV-1蛋白酶
-
使用
AutoDock Vina执行docking预测。- 在windows命令行提示符或linux终端下运行命令
vina --config conf.txt,大概需要几分钟时间。
- 在windows命令行提示符或linux终端下运行命令
-
输出结果包含两个文件,构象文件
dockingResult.pdbqt和日志文件docking.log。dockingResult.pdbqt: 包含所有docking的模式,通常第一个为结合最好的构象,但如果前几个能量值相差不大时也有例外。docking.log: 日志文件,包含结合能量值(第一列,越低越稳定,默认由低到高排序,所以第一个为最好的构象)、每个构象与第一个构象的距离、每个构象与第一个构象的差别。
Detected 4 CPUs
Reading input ... done.
Setting up the scoring function ... done.
Analyzing the binding site ... done.
Using random seed: 2009
Performing search ... done.
Refining results ... done.

mode |   affinity | dist from best mode
     | (kcal/mol) | rmsd l.b.| rmsd u.b.
-----+------------+----------+----------
   1        -11.5      0.000      0.000
   2        -10.6      1.425      4.304
   3        -10.4      2.042     10.990
   4        -10.3      2.034     10.326
   5        -10.2      2.517      4.774
   6        -10.1      1.933     10.911
   7         -9.9      2.176     10.884
   8         -9.8      1.794      3.600
   9         -9.6      1.981     10.865
  10         -9.5      2.431     10.943
  11         -9.3      2.417     10.370
  12         -8.9      2.404     10.285
  13         -8.8      4.058     10.904
  14         -8.7      5.574     11.291
  15         -8.7      4.441      8.312
  16         -8.6      5.659      8.929
  17         -8.6      4.404      8.275
  18         -8.5      5.630      8.900
Writing output ... done.
The key results in a docking log are the docked structures found at the end of each run, the energies of these docked structures and their similarities to each other. The similarity of docked structures is measured by computing the root-mean-square-deviation, rmsd, between the coordinates of the atoms. The docking results consist of the PDBQ of the Cartesian coordinates of the atoms in the docked molecule, along with the state variables that describe this docked conformation and position.
用PyMOL可视化docking结果。
打开PyMOL,依次点选File-Open文件类型选择All Files-选取结果dockingResult.pdbqt文件、原始蛋白和配体的pdb文件、原教程的pdbqt文件。
- dockingResult.pdbqt: 增加非极性氢的docking结果
- dockingResultAllH.pdbqt: 增加所有氢的docking结果
- original_tutorial_result.pdbqt:原教程中的docking结果

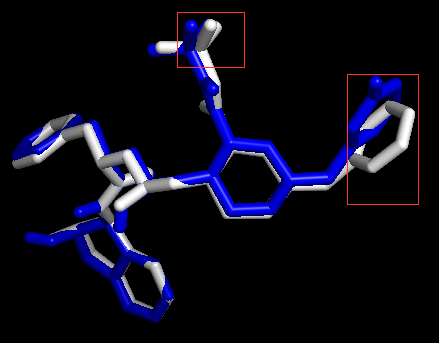
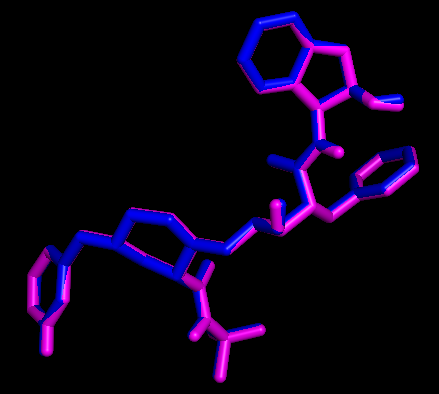
用PyMOL展示配体和受体相互作用的原子和氢键
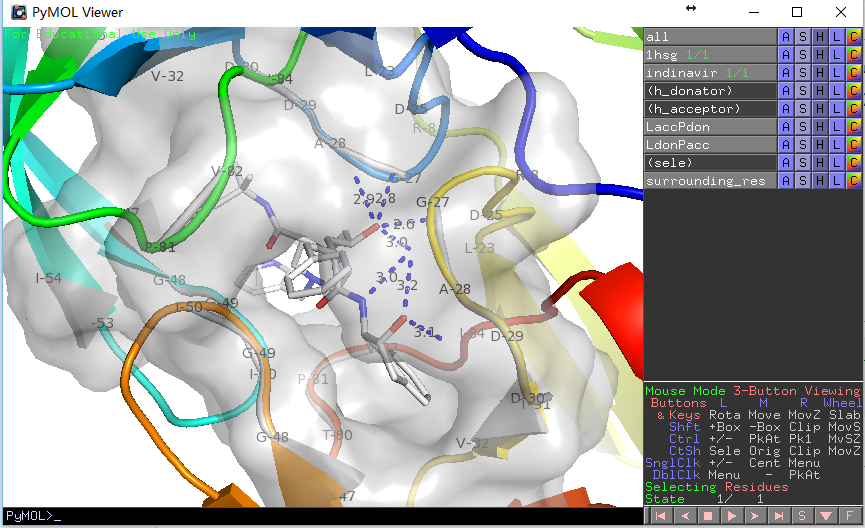
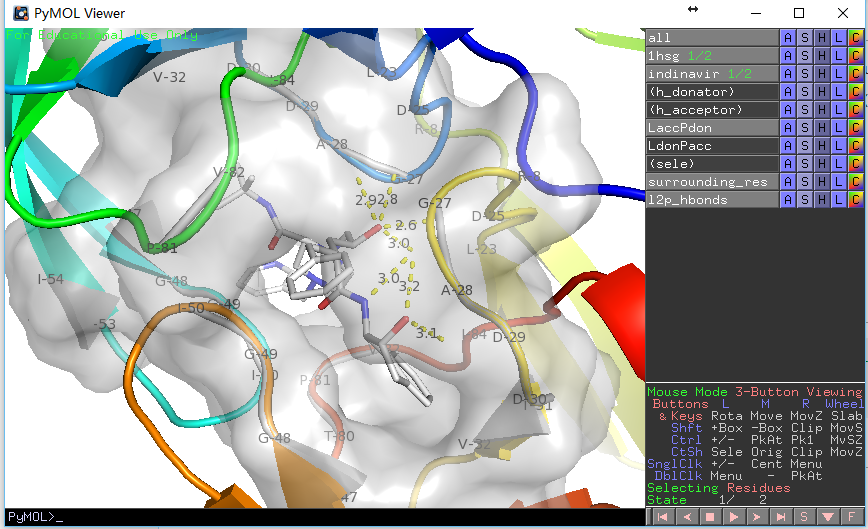
为了简化展示过程,我们设计了一个pml脚本 (脚本内有很详细的解释),只需要修改脚本里面受体和配体的名字,然后在PyMOL的命令行界面输入PyMOL> run display.pml即可获得展示结果。当然这个脚本也可以使用程序generatePmlForHbond.py生成。
 ############################################################
###All one needs to do is replacing:                        ##
###  * Protein structure file: E:\docking\1hsg_prot.pdb     ##
###  * Protein name: 1hsg                                   ##
###  * Docking result file: E:\docking\indinavir.pdbqt      ##
###  * Docking result name (normally ligand name): indinavir##
 ############################################################
# The following 4 lines:
	# 1. load protein structure and rename it
	# 2. add hydrogen (`h_add` uses a primitive algorithm to add hydrogens onto a molecule.)
	# 3. hide protein display
	# 4. show cartoon display for protein
load E:\yunpan\docking\1hsg_prot.pdb, 1hsg
h_add 1hsg
hide everything, 1hsg
show cartoon, 1hsg
cmd.spectrum("count", selection="1hsg", byres=1)

# The following 6 lines:
	# 1. load ligand structure and rename it
	# 2. add hydrogen
	# 3. hide ligand display
	# 4. show ligand in sticks mode
	# 5. Set width of stick to 0.15
	# 6. Set atom color: C-white;N-blue;O-red
load E:\yunpan\docking\indinavir.pdbqt, indinavir
h_add indinavir
hide everything, indinavir
show sticks, indinavir
set stick_radius, 0.15
util.cbaw indinavir

# The following 1 line:
	# 1. Select metal ions
select metals, symbol mg+ca+fe+zn

# The following 2 lines:
	# 1. Set hydrogen donator
	# 2. Set hydrogen accrptor
	# `select` creates a named selection from an atom selection.
	# `select name, (selection)`
select h_donator,  (elem n,o and (neighbor hydro))
select h_acceptor, (elem o or (elem n and not (neighbor hydro)))

# The following 4 lines:
	# 1. Create link between ligand_h_acceptor and prot_h_donator  within given distance 3.2
	# 2. Create link between ligand_h_donator  and prot_h_acceptor within given distance 3.2
	#    Set filter 3.6 for ideal geometry and filter 3.2 for minimally acceptable geometry
	# 3. Set red color for ligand_h_acceptor and prot_h_donator
	# 4. Set blue color for ligand_h_donator  and prot_h_acceptor
	# `distance` creates a new distance object between two selections. It will display all distances within the cutoff. Distance is also used to make hydrogen bonds like `distance hbonds, all, all, 3.2, mode=2`.
	# distance [ name [, selection1 [, selection2 [, cutoff [, mode ]]]]]
distance LaccPdon, (indinavir and h_acceptor), (1hsg and h_donator), 3.2
distance LdonPacc, (indinavir and h_donator), (1hsg and h_acceptor), 3.2
color red, LaccPdon
color blue, LdonPacc
#distance Fe_C20, (fep and name C20), (heme and name fe))

# The following 6 lines:
	# 1. Select non-hydro atoms of ligands
	# 2. Select protein atoms within 5A of selected atoms in last step
	# 3. Label alpha-c(ca) of selected residues with residue name and residue position
	# 4. Set label color back
	# 5. Set background white
	# 6. Hidden hydrogenes
select sele, indinavir & not hydro
select sele, byres (sele expand 5) & 1hsg
one_letter ={'VAL':'V', 'ILE':'I', 'LEU':'L', 'GLU':'E', 'GLN':'Q', \
'ASP':'D', 'ASN':'N', 'HIS':'H', 'TRP':'W', 'PHE':'F', 'TYR':'Y',    \
'ARG':'R', 'LYS':'K', 'SER':'S', 'THR':'T', 'MET':'M', 'ALA':'A',    \
'GLY':'G', 'PRO':'P', 'CYS':'C'}
label name ca & sele, "%s-%s" % (one_letter[resn],resi)
bg white
set label_color, black
hide (hydro)

# The follwing 5 lines
	# 1. Comment out this line
	# 2. Create an object `surrounding_res` to represent selected protein atoms
	#    `create`: creates a new molecule object from a selection. It can also be used to create states in an   existing object.
	#    `create name, (selection)`
	# 3. Display created surface
	# 4. Set color for surrounding_res
	# 5. Set transparency for surrounding_res
	#    Transparency is used to adjust the transparency of Surfaces and Slices.
	#    `set transparency, F, selection`
#show surface, 1hsg
create surrounding_res, sele
show surface, surrounding_res
color grey80, surrounding_res
set transparency, 0.5, surrounding_res
此外还可以使用如下脚本(list_hbonds.py)输出相互作用的原子及其位置。
# Copyright (c) 2010 Robert L. Campbell
from pymol import cmd

def list_hb(selection,selection2=None,cutoff=3.2,angle=55,mode=1,hb_list_name='hbonds'):
    """
    USAGE

    list_hb selection, [selection2 (default=None)], [cutoff (default=3.2)],
                       [angle (default=55)], [mode (default=1)],
                       [hb_list_name (default='hbonds')]

    The script automatically adds a requirement that atoms in the
    selection (and selection2 if used) must be either of the elements N or
    O.

    If mode is set to 0 instead of the default value 1, then no angle
    cutoff is used, otherwise the angle cutoff is used and defaults to 55
    degrees.

    e.g.
    To get a list of all H-bonds within chain A of an object
      list_hb 1abc & c. a &! r. hoh, cutoff=3.2, hb_list_name=abc-hbonds

    To get a list of H-bonds between chain B and everything else:
      list_hb 1tl9 & c. b, 1tl9 &! c. b

    """
    cutoff=float(cutoff)
    angle=float(angle)
    mode=float(mode)
    # ensure only N and O atoms are in the selection
    selection = selection + " & e. n+o"
    if not selection2:
        hb = cmd.find_pairs(selection,selection,mode=mode,cutoff=cutoff,angle=angle)
    else:
        selection2 = selection2 + " & e. n+o"
        hb = cmd.find_pairs(selection,selection2,mode=mode,cutoff=cutoff,angle=angle)

    # sort the list for easier reading
    hb.sort(lambda x,y:(cmp(x[0][1],y[0][1])))

    for pairs in hb:
        cmd.iterate("%s and index %s" % (pairs[0][0],pairs[0][1]), 'print "%1s/%3s`%s/%-4s " % (chain,resn,resi,name),')
        cmd.iterate("%s and index %s" % (pairs[1][0],pairs[1][1]), 'print "%1s/%3s`%s/%-4s " % (chain,resn,resi,name),')
        print "%.2f" % cmd.distance(hb_list_name,"%s and index %s" % (pairs[0][0],pairs[0][1]),"%s and index %s" % (pairs[1][0],pairs[1][1]))

#cmd.extend("list_hb",list_hb)
#if __name__ == "__main__":
cmd.load("E:/yunpan/docking/1hsg_prot.pdb", "1hsg")
cmd.h_add("(1hsg)")
cmd.load("E:/yunpan/docking/indinavir.pdbqt","indinavir")
cmd.h_add("(indinavir)")

h_donator  = "elem n,o & (neighbor hydro)"
h_acceptor = "elem o | (elem n & !(neighbor hydro))"

lacc = "indinavir & (elem o | (elem n & !(neighbor hydro)))"
ldon = "indinavir & (elem n,o & (neighbor hydro))"
pacc = "1hsg & (elem o | (elem n & !(neighbor hydro)))"
pdon = "1hsg & (elem n,o & (neighbor hydro))"

list_hb(ldon, pacc, hb_list_name="l2p_hbonds")
list_hb(lacc, pdon, hb_list_name="p2l_hbonds")
输出结果如下:
PyMOL>run E:/docking/list_hbonds.py
B/MK1`902/N4    B/GLY`27/O     3.03
B/MK1`902/O4    B/GLY`27/O     3.16
B/MK1`902/O2    A/ASP`25/OD1   2.77
B/MK1`902/O2    B/ASP`25/OD1   2.63
看上去比显示的氢键少了三个,这是因为我们在第二个函数中使用了H-键角度限制,如果在调用时给定参数list_hb(mode=0)则会获得一致结果。
展示疏水表面
# color_h
# -------

# PyMOL command to color protein molecules according to the Eisenberg hydrophobicity scale

#
# Source: http://us.expasy.org/tools/pscale/Hphob.Eisenberg.html
# Amino acid scale: Normalized consensus hydrophobicity scale
# Author(s): Eisenberg D., Schwarz E., Komarony M., Wall R.
# Reference: J. Mol. Biol. 179:125-142 (1984)
#
# Amino acid scale values:
#
# Ala:  0.620
# Arg: -2.530
# Asn: -0.780
# Asp: -0.900
# Cys:  0.290
# Gln: -0.850
# Glu: -0.740
# Gly:  0.480
# His: -0.400
# Ile:  1.380
# Leu:  1.060
# Lys: -1.500
# Met:  0.640
# Phe:  1.190
# Pro:  0.120
# Ser: -0.180
# Thr: -0.050
# Trp:  0.810
# Tyr:  0.260
# Val:  1.080
#
# Usage:
# color_h (selection)
#
from pymol import cmd

def color_h(selection='all'):
        s = str(selection)
	print s
        cmd.set_color('color_ile',[0.996,0.062,0.062])
        cmd.set_color('color_phe',[0.996,0.109,0.109])
        cmd.set_color('color_val',[0.992,0.156,0.156])
        cmd.set_color('color_leu',[0.992,0.207,0.207])
        cmd.set_color('color_trp',[0.992,0.254,0.254])
        cmd.set_color('color_met',[0.988,0.301,0.301])
        cmd.set_color('color_ala',[0.988,0.348,0.348])
        cmd.set_color('color_gly',[0.984,0.394,0.394])
        cmd.set_color('color_cys',[0.984,0.445,0.445])
        cmd.set_color('color_tyr',[0.984,0.492,0.492])
        cmd.set_color('color_pro',[0.980,0.539,0.539])
        cmd.set_color('color_thr',[0.980,0.586,0.586])
        cmd.set_color('color_ser',[0.980,0.637,0.637])
        cmd.set_color('color_his',[0.977,0.684,0.684])
        cmd.set_color('color_glu',[0.977,0.730,0.730])
        cmd.set_color('color_asn',[0.973,0.777,0.777])
        cmd.set_color('color_gln',[0.973,0.824,0.824])
        cmd.set_color('color_asp',[0.973,0.875,0.875])
        cmd.set_color('color_lys',[0.899,0.922,0.922])
        cmd.set_color('color_arg',[0.899,0.969,0.969])
        cmd.color("color_ile","("+s+" and resn ile)")
        cmd.color("color_phe","("+s+" and resn phe)")
        cmd.color("color_val","("+s+" and resn val)")
        cmd.color("color_leu","("+s+" and resn leu)")
        cmd.color("color_trp","("+s+" and resn trp)")
        cmd.color("color_met","("+s+" and resn met)")
        cmd.color("color_ala","("+s+" and resn ala)")
        cmd.color("color_gly","("+s+" and resn gly)")
        cmd.color("color_cys","("+s+" and resn cys)")
        cmd.color("color_tyr","("+s+" and resn tyr)")
        cmd.color("color_pro","("+s+" and resn pro)")
        cmd.color("color_thr","("+s+" and resn thr)")
        cmd.color("color_ser","("+s+" and resn ser)")
        cmd.color("color_his","("+s+" and resn his)")
        cmd.color("color_glu","("+s+" and resn glu)")
        cmd.color("color_asn","("+s+" and resn asn)")
        cmd.color("color_gln","("+s+" and resn gln)")
        cmd.color("color_asp","("+s+" and resn asp)")
        cmd.color("color_lys","("+s+" and resn lys)")
        cmd.color("color_arg","("+s+" and resn arg)")
cmd.extend('color_h',color_h)

def color_h2(selection='all'):
        s = str(selection)
	print s
	cmd.set_color("color_ile2",[0.938,1,0.938])
	cmd.set_color("color_phe2",[0.891,1,0.891])
	cmd.set_color("color_val2",[0.844,1,0.844])
	cmd.set_color("color_leu2",[0.793,1,0.793])
	cmd.set_color("color_trp2",[0.746,1,0.746])
	cmd.set_color("color_met2",[0.699,1,0.699])
	cmd.set_color("color_ala2",[0.652,1,0.652])
	cmd.set_color("color_gly2",[0.606,1,0.606])
	cmd.set_color("color_cys2",[0.555,1,0.555])
	cmd.set_color("color_tyr2",[0.508,1,0.508])
	cmd.set_color("color_pro2",[0.461,1,0.461])
	cmd.set_color("color_thr2",[0.414,1,0.414])
	cmd.set_color("color_ser2",[0.363,1,0.363])
	cmd.set_color("color_his2",[0.316,1,0.316])
	cmd.set_color("color_glu2",[0.27,1,0.27])
	cmd.set_color("color_asn2",[0.223,1,0.223])
	cmd.set_color("color_gln2",[0.176,1,0.176])
	cmd.set_color("color_asp2",[0.125,1,0.125])
	cmd.set_color("color_lys2",[0.078,1,0.078])
	cmd.set_color("color_arg2",[0.031,1,0.031])
        cmd.color("color_ile2","("+s+" and resn ile)")
        cmd.color("color_phe2","("+s+" and resn phe)")
        cmd.color("color_val2","("+s+" and resn val)")
        cmd.color("color_leu2","("+s+" and resn leu)")
        cmd.color("color_trp2","("+s+" and resn trp)")
        cmd.color("color_met2","("+s+" and resn met)")
        cmd.color("color_ala2","("+s+" and resn ala)")
        cmd.color("color_gly2","("+s+" and resn gly)")
        cmd.color("color_cys2","("+s+" and resn cys)")
        cmd.color("color_tyr2","("+s+" and resn tyr)")
        cmd.color("color_pro2","("+s+" and resn pro)")
        cmd.color("color_thr2","("+s+" and resn thr)")
        cmd.color("color_ser2","("+s+" and resn ser)")
        cmd.color("color_his2","("+s+" and resn his)")
        cmd.color("color_glu2","("+s+" and resn glu)")
        cmd.color("color_asn2","("+s+" and resn asn)")
        cmd.color("color_gln2","("+s+" and resn gln)")
        cmd.color("color_asp2","("+s+" and resn asp)")
        cmd.color("color_lys2","("+s+" and resn lys)")
        cmd.color("color_arg2","("+s+" and resn arg)")
cmd.extend('color_h2',color_h2)
将上面的脚本存储为color_h.py,在PyMOL界面运行File-Run-color_h.py,在命令行输入>PyMOl color_h- Show surface。
Docking非原生配体
在前面的例子中,AutoDock Vina能把配体构象调整到几乎原生的构象,验证了这一预测方法的准确度。下面,我们尝试docking另外一个配体药物nelfinavir奈非那韦,来展示如何寻找小分子在蛋白内的结合位点。这个过程可以进一步地凝练和扩展作为“虚拟筛选(virtual screening)”的步骤。
重复上述步骤执行docking
-
获取nelfinavir.pdb:为教程提供的pdb文件(可从
1OHR.pdb获得) -
按照上述步骤对配体文件进行预处理获得
pdbqt格式文件。 -
修改配置文件,执行Docking,输出日志如下,并用
PyMOL可视化结果。Detected 4 CPUs Reading input ... done. Setting up the scoring function ... done. Analyzing the binding site ... done. Using random seed: 2009 Performing search ... done. Refining results ... done. mode | affinity | dist from best mode | (kcal/mol) | rmsd l.b.| rmsd u.b. -----+------------+----------+---------- 1 -11.2 0.000 0.000 2 -11.0 1.878 9.618 3 -9.8 1.354 4.254 4 -9.6 1.732 8.679 5 -9.5 1.192 1.814 6 -9.2 1.669 2.269 7 -9.0 2.003 8.075 8 -8.7 1.850 3.803 9 -8.4 1.856 9.549 Writing output ... done.
评估docking结果
-
对这个例子来讲,PDB中存在nelfinavir与HIV-1蛋白酶的晶体结构(1OHR),可以作为金标准来检测docking的准确性。
-
PyMOL中导入
1OHR.pdb文件,在对象面板中依次点选1OHR行-H-Hide everything-S-Show cartoons-C-By chain。从图中可以看到这两个蛋白酶体在空间的方向不同,因此我们需要重新比对这两个结构,运行PyMOL> align 1OHR, 1hsg_prot,可以看到两个结构完全重合了。You may have observed that moving the structure around the window is a bit difficult since the origin of the view has been altered when you loaded 1OHR.pdb. To reset it, try:
PyMOL> reset,运行之后没有看到变化。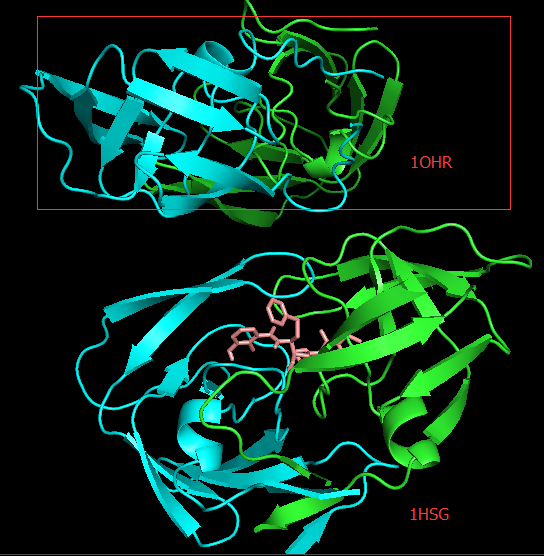
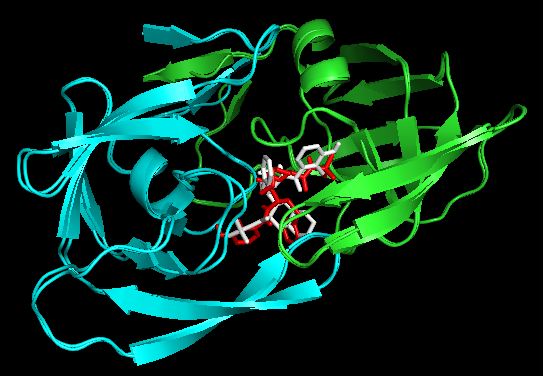
Docking结果展示。第一张图表示2个晶体结构align前的展示;第二张图表示2个晶体align后重合在了一起。白色化合物为1OHR PDB晶体结构中配体nelfinavir的构象,视为金标准。红色为本教程的结果(只加极性氢)。 -
展示PDB文件中的蛋白结合的化合物提取
1OHR中的nelfinavir (残基为1UN),运行PyMOL> select nelfinavir, 1OHR and resn 1UN;在对象面板更改其展示方式,依次点选S-Show sticks-C-white。通过与金标准比对,判断哪个构象是预测的最佳模式。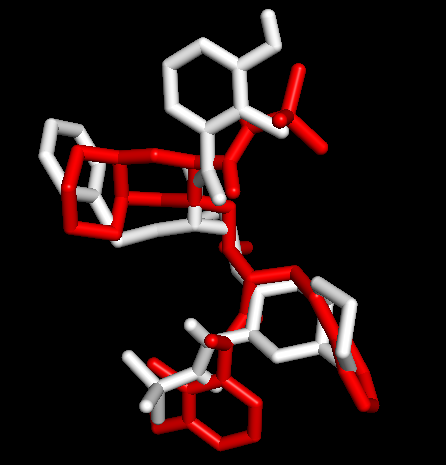
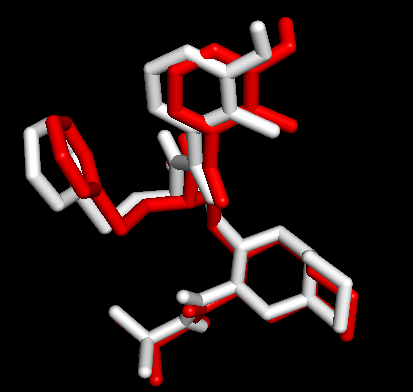
Docking第一张图表示AutoDock Vina输出结果的Best Mode与金标准的比对情况;第二张图表示AutoDock Vina输出结果的Second Best Mode与金标准的比对情况;白色化合物为1OHR PDB晶体结构中配体nelfinavir的构象,视为金标准。红色为本教程的结果(只加极性氢)。 结果看到
second best mode看上去吻合的更好,为什么呢?从日志的结合能量来看,best mode和second best mode只差了0.2。那么还有一个问题,1SHG的chainA与1OHR的chainA是不是一个呢?我们比对1OHR的chainA与1HSG的chainB,
PyMOL> align 1OHR and chain A, 1hsg_prot and chain B。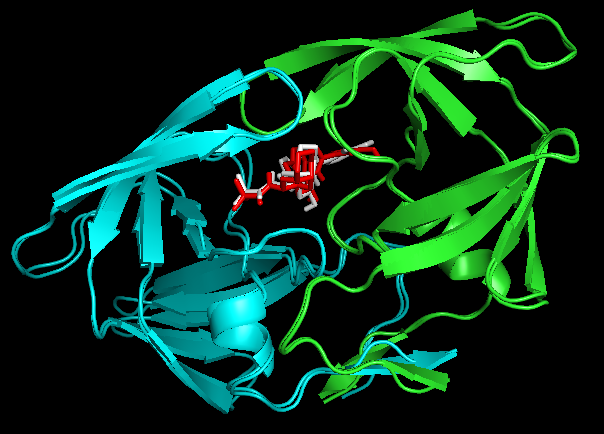
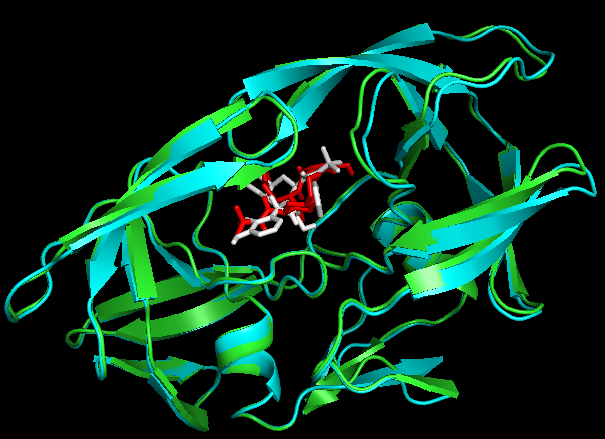
Docking结果展示。第一张图表示2个晶体结构align后重合在了一起。第二张图表示1OHR的chainA与1HSG的chainB比对的结果。白色化合物为1OHR PDB晶体结构中配体nelfinavir的构象,视为金标准。红色为本教程的预测的second best mode结果(只加极性氢)。
用PyMOL在蛋白表面搭建静电层 (electrostatic surface)
静电作用在分子docking过程中发挥着重要的作用,接下来将观察静电力是如何与配体作用的。前面提到,PDB结构中不包含原子的局部电荷信息,而这对静电力场的计算是很重要的。因此我们需要给PDB文件中增加这一数据。
为了完成这一任务,我们需要在http://www.poissonboltzmann.org/注册,然
后下载安装软件
APBS和
pdb2pqr。
-
在Windows下,
APBS直接下载使用默认的安装目录安装即可;pdb2pqr解压缩到C:\pdb2pqr; 路径中不能有空格。设置环境变量:
我的电脑-属性-高级系统设置-高级-环境变量-系统变量中选中PATH-编辑-新建-加入安装路径(如下图所示)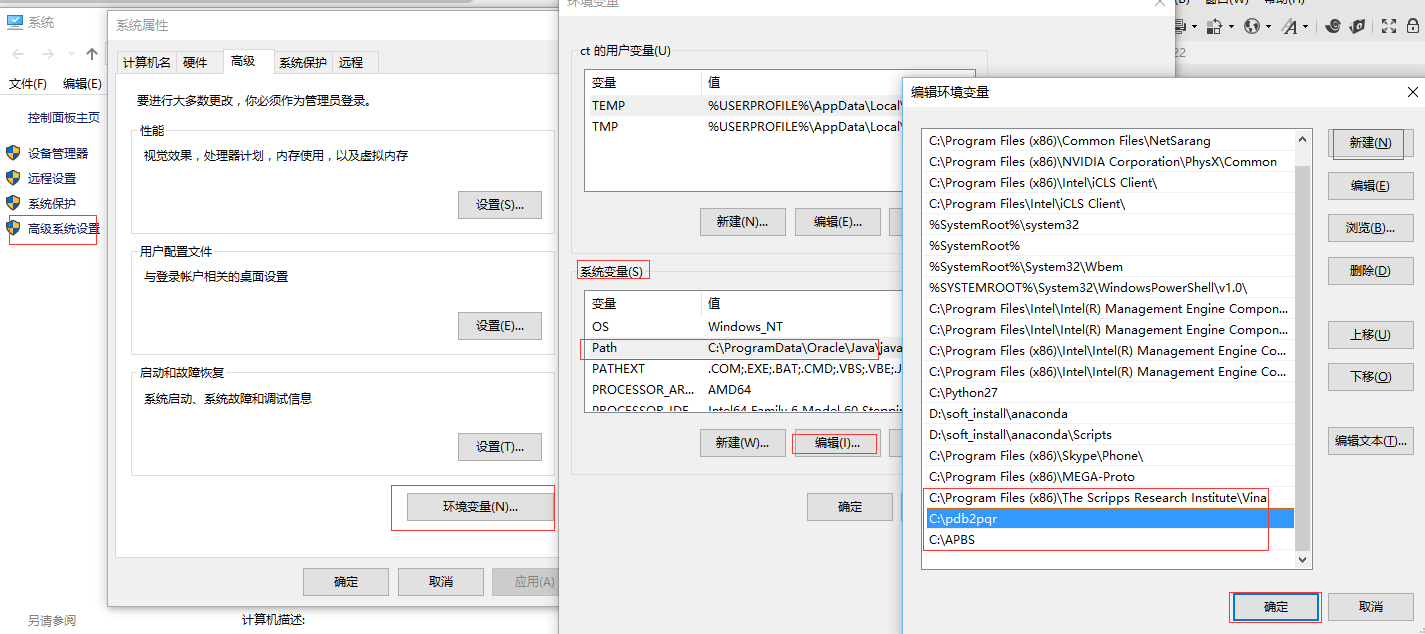
安装完成之后,启动PyMOL,会在
Plugin下看到APBS Tools。 -
在Lunux下,尚未试验。
打开PyMOL并读入1hsg_prot.pdb,然后通过下述步骤启动并配置APBS,
依次点击菜单或按钮:
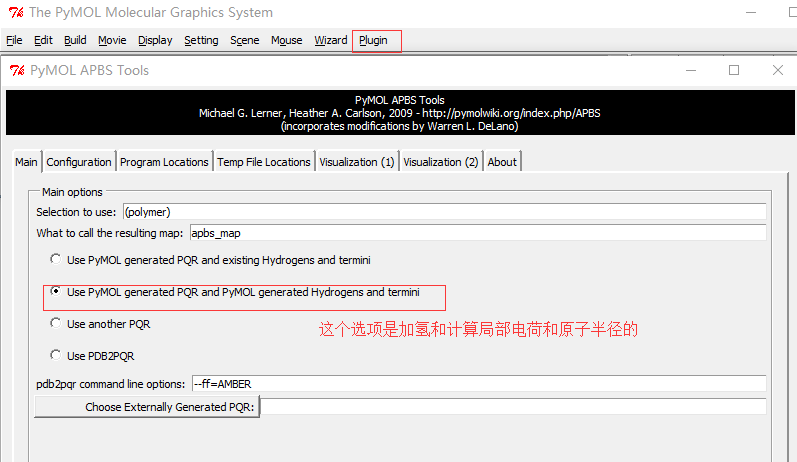
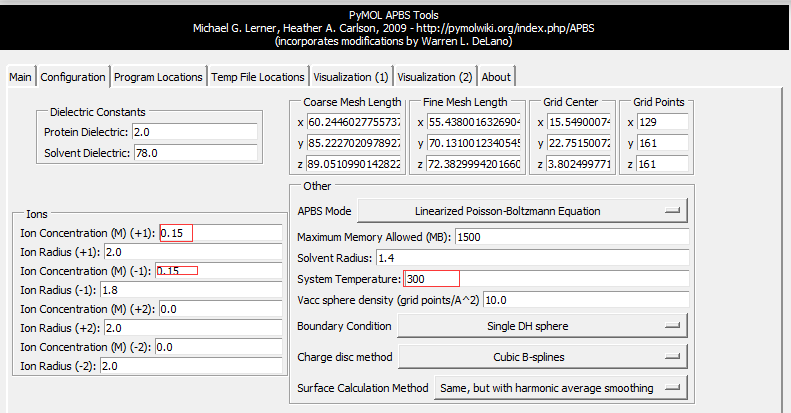
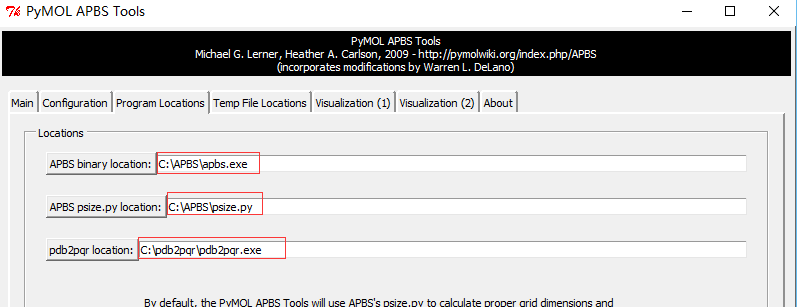
Plugin-APBS Tools-Main-Select Use PyMOL generated PQR and PyMOL generated Hydrogens and termini(这步操作是给PDB文件中的每个原子 加氢、局部电荷和计算原子半径;This adds hydrogens and assigns partial charges and atomic radii to each atom in the PDB file.)Configuration-Set grid(点击后定义了一个保护蛋白的框,但并未显示 ,因此点击后看不到框,但可以看到一系列的计算过程体现在展示界面。This defines a grid that encloses the protein, but Grid is not displayed on the screen) -System Temperature = 300-on concentration (+1) and (-1) to 0.15(相当于 0.15摩尔的阳离子和阴离子, which is equivalent of 0.15M cations and anions)- 按图设置APBS和pdb2pqr的路径 -
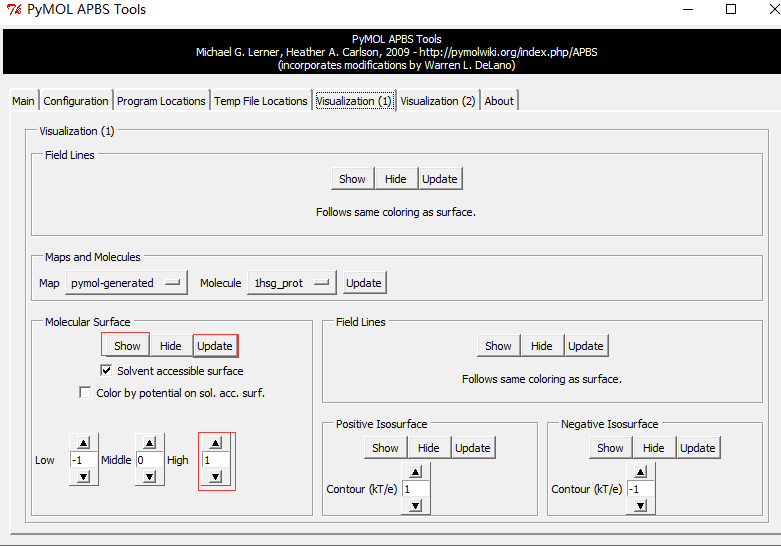
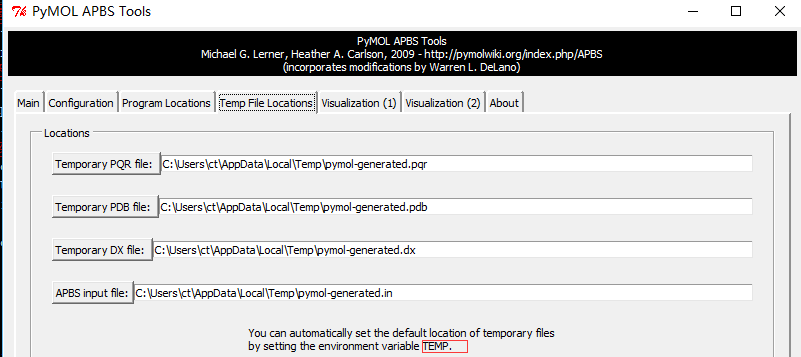
Run APBS-Visualization-Update(如果出现Unable to open file error,运行命令PyMOL > load C:\Users\ct\AppData\Local\Temp\pymol-generated.dx) -Molecular Surface - Show
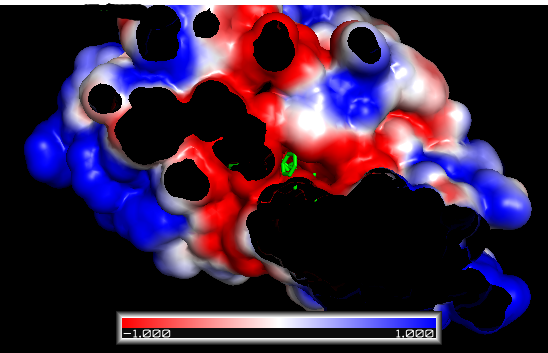
静电等高线图(Electrostatic isocontours)
PyMOL makes this step very easy: adjust the positive and negative “Contour” fields to the desired values (usually ±1, ±5, or ±10 kT/e) and hit the Positive Isosurface and Negative Isosurface and Show buttons.
±1 kT/e electrostatic potential isocontours of FAS2 in PyMOL
If the colors are not as you expect, you can change the colors of the objects iso_neg and iso_pos in the main menu. By convention (for electrostatics in chemistry), red is negative (think oxygen atoms in carboxyl groups) and blue positive (think nitrogen atoms in amines).
得到这个图之后,我们首先需要看配体是否落在受体的”口袋”里;然后检查配体与受体之间原子的化学匹配,如配体中的碳原子应该与受体的疏水原子结合, 氮原子和氧原子与其受体中相近原子结合;然后看有没有电荷互补;最后根据已有知识查看结合q区域有没有包括蛋白的活性位点, 以及活性位点怎么与受体相互作用的。
用ADT可视化结果
-
导入Vina输出结果:打开ADT依次点选
Analyze-Dockings-Open AutoDock Vina result-选择``结果PDBQT文件dockingResult.pdbqt-Single molecular with multiple conformations。 -
导入蛋白结构:
Analzye-Macromolecule-Open-1hsg_prot.pdbqt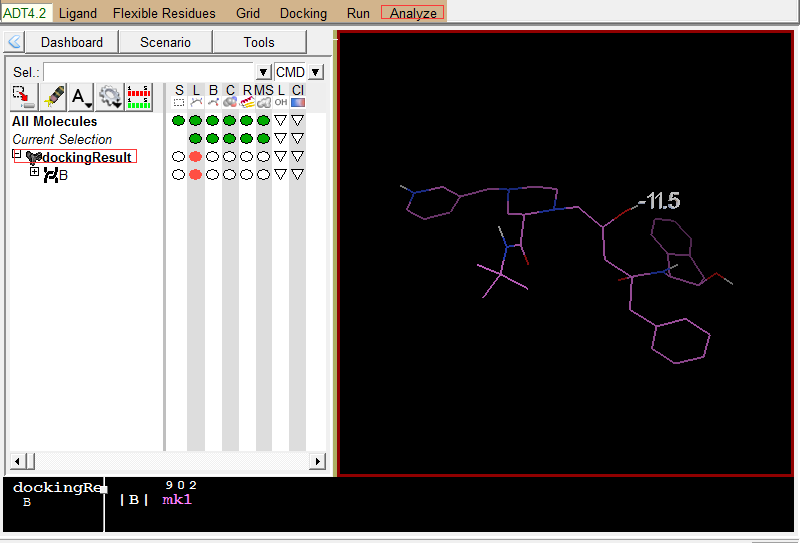
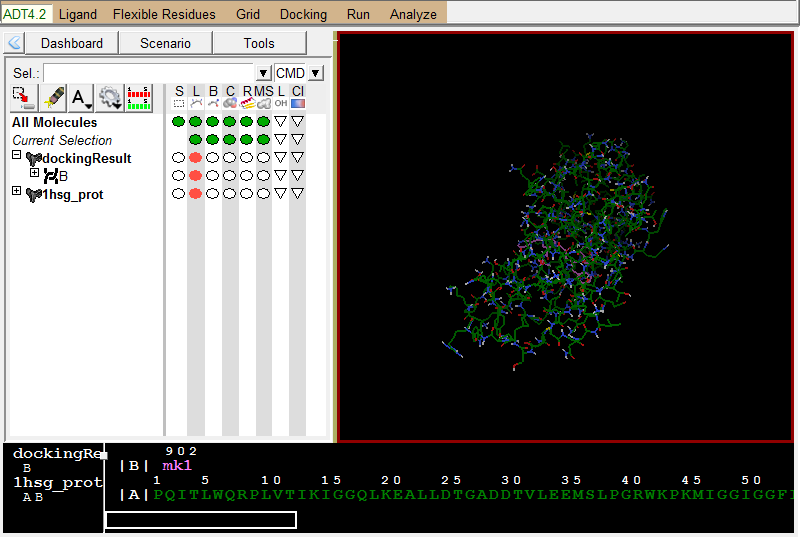
左图是Vina结果展示;右图为蛋白结果展示 -
展示相互作用:
Analyze-Dockings-Show interactionsThis display is radically different: the viewer background color is white, the ligand is displayed with a solvent-excluded molecular surface, atoms in the receptor which are hydrogen-bonded or in close-contact to atoms in the ligand are shown as spheres AND pieces of secondary structure are shown for sequences of 3 or more residues in the receptor which are interacting with the ligand. The GUI for this command lets you turn on and off different parts of this specialized display as well as list interactions in the python shell.
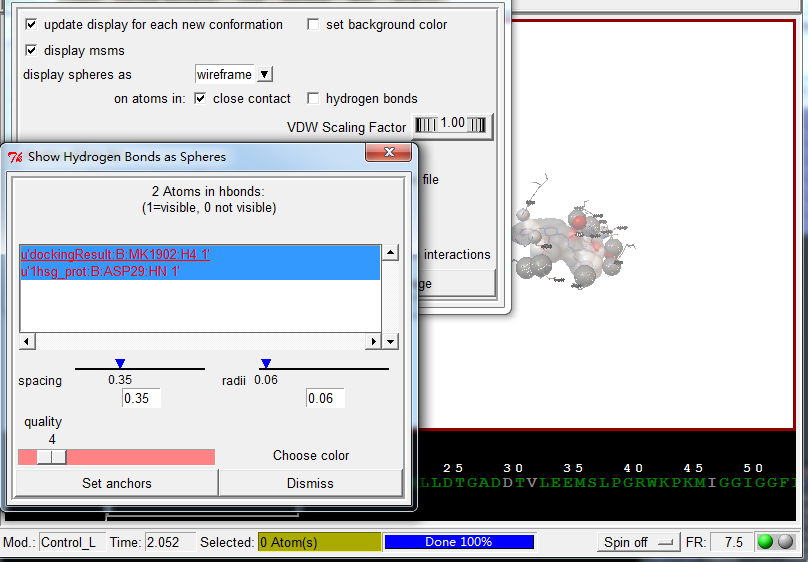
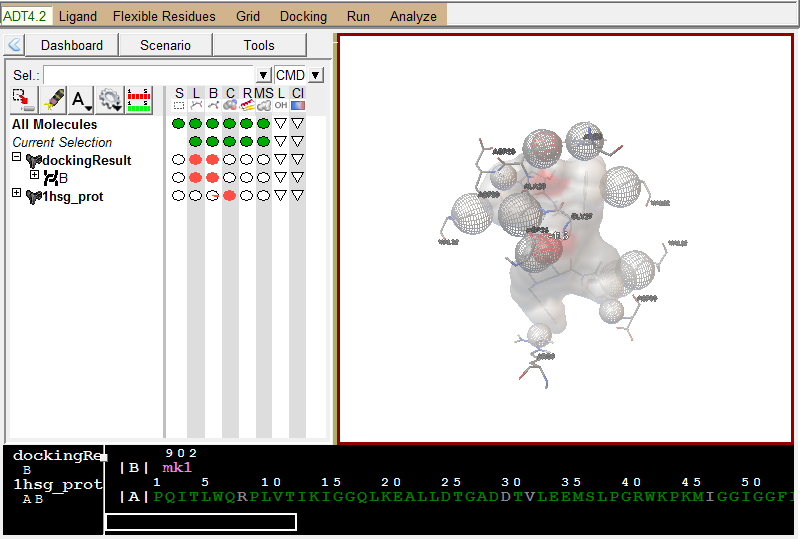
配体与受体作用展示, 使用方向键切换不同的配体构象
虚拟筛选
-
准备受体文件
prepare_receptor4.py -r 1hsg_prot.pdb -o 1hsg_prot.auto.pdbqt -A hydrogens。【注:脚本在目录mgltools_x86_64Linux2_1.5.6/MGLToolsPckgs/AutoDockTools/Utilities24下, 自行添加到环境变量或参照软件安装部分】 -
准备配体文件
prepare_ligand4.py -l indinavir.pdb -o indinavir.auto.pdbqt -A bonds_hydrogens。 -
还有关键一步是确定搜索空间,书写conf.txt文件。可以简单的以蛋白的中心为搜索空间的中心,蛋白各个维度坐标值的标准差、极差及其组合分别作为搜索空间的大小;在大范围搜索结束后,根据docking结果再重新选取Docking小分子的中心为搜索空间的中心,其各个维度坐标值的标准差、极差及其组合分别作为搜索空间的大小,再进行精细搜索。
-
执行Docking
vina --config conf.txt -
prepare_receptor4.py和prepare_ligand4.py支持pdb\mol2格式文件。
FAQ
-
怎么判断哪个是想要的结果?
When the results are sorted by lowest-energy, the compounds which bind as well as your positive control or better can be considered potential hits. (Remember to allow for the ~2.1 kcal/mol standard error of AutoDock). If you have no positive control, consider the compounds with the lowest energies as potential hits.)
-
怎么分析结果?
Sort them by lowest energy first, then use ADT to inspect the quality of the binding. Generally it is wise to inspect the top 30 to 50 results.
-
可视化结果时关注哪些方面?
A: The first thing to check is that the ligand is docking into some kind of pocket on the receptor. The second is that there is a chemical match between the atoms in the ligand and those in the receptor. For example, check that carbon atoms in the ligand are near hydrophobic atoms in the receptor while nitrogens and oxygens in the ligand are near similar atoms in the binding pocket. Check for charge complementarity. Check whatever else you may know about your particular system: for instance, if you know that the enzymatic action of your protein involves a particular residue, examine how the ligand binds to that residue. In the case of HIV protease, good inhibitors bind in a mode which mimics the transition state.
-
配体小分子获取
-
NCI Diversity Set
To expedite drug discovery, the National Cancer Institute maintains a resource of more than 140, 000 synthetic chemicals and 80, 000 natural products for which it can provide samples for high-through-put screening (HTS). The NCI Diversity Set is a collection of 1990 compounds selected to represent the structural diversity in the whole resource.
-
ZINC
ZINC Is Not Commerical is a free database of over 4.6 million commercially-available compounds for virtual screening (blaster.docking.org/zinc).
-
-
如何绘制小分子?
- 使用Gaussview从头画出配体的空间结构模型保存为mol2文件,稍微复杂的分子在画完后需要做一下量子化学水平的结构优化
- 如果配体十分复杂,可以先使用ChemDraw或ChemBioDraw画出配体结构的平面图,保存成cdx后缀的文件,然后使用OpenBabel转换成mol2文件
babel -icdx Ligand_1.cdx -omol2 ligand.mol2 --gen3D[参数--gen3D输出立体结构]。 - SDF文件转mol2,
babel -i sdf Ligand.sdf -o mol2 ligand.mol2 --gen3D。
-
始终需要加氢吗?
Yes, for both the macromolecule and the ligand, you should always add hydrogens, compute Gasteiger charges and then you must merge the non-polar hydrogens. Polar hydrogens are hydrogens that are bonded to electronegative atoms like oxygen and nitrogen. Non-polar hydrogens are hydrogens bonded to carbon atoms.
-
可以使用AutoDock确认潜在的结合位点吗?
如果不知道配体在受体上的结合位点,就设置一个大到足够覆盖整个受体蛋白表面的长方体(在每个维度设置更多的grid points,加大grid spacing)。然后执行Docking。利用这次分子对接的结果再针对性的设定Grid的大小和位置,再执行Docking。如果蛋白特别大,那么可以分多次设置Grid,如第一次覆盖蛋白上面2/3, 第二次覆盖中间2/3,第三次覆盖下面2/3等。
-
确定大分子活性位点方法总结
- 查阅文献,根据文献报道找到活性位点。
- 如果有受体-配体的三维结构,则可以运用配体扩张法,确定活性位点,就是以配体的位置为中心,再向外扩增一定范围,一般为6.5到9埃,这个范围的受体残基就构成了相关的活性位点。
- 利用分子空洞技术列如MOE中的site Finder模块,然后根据经验规律,(疏水残基最多的空洞为活性位点)判断活性位点。
- Discovery Studio Visualizer (free)观察配体结合位点,也可试试from PDB Site records或from receptor cavities确定活性位点。
- 有一个活性位点预测网上服务器 Q-Site Finder 地址http://www.modelling.leeds.ac.uk/qsitefinder/
- 找一个序列结构类似的有配体-受体复合物的3D结构,与未知活性位点的蛋白进行对比:
- 在PyMOL中, 载入两个蛋白
- 用align 将未知活性位点的蛋白与配体-受体蛋白进行比对
- 标记未知活性位点的蛋白残基
- 保存比对并标记过的未知活性位点蛋白
-
如果某一蛋白受体有多个晶体。我们要从中选择那一个比较好呢?:
- 采用解析晶体分辨率较高的
- 观察晶体图的B-因子
- 蛋白和配体的平均B-因子之间的不同
- 配体、受体的电子密度。
- 选择的蛋白受体的来源与研究的生物体一致
- 选择残基(特别是活性位点)完整,分辨率高的蛋白受体。
- 选择结合位点,温度系数较低的蛋白受体。
- 选择配体物与蛋白形成复合物的蛋白,最好配体的构想、结构构像与研究的小分子类似。
文件格式解释
PDB文件 (详细格式描述)
基本信息部分
HEADER记录: 包括分子的分类、提交日期、PDB IDTITLE记录: 为该结构的描述,如果有多行,除第一行外,其它行有连续的数字标示。COMPND记录: 包含分子数目、名字、链特征、分子是如何获得的等。SOURCE记录: 大分子的生物或化学来源KEYWDS记录:关键字EXPDTA记录:实验信息JRNL记录:文献引用信息REMARK记录:更为丰富的记录信息
HEADER    HYDROLASE (ACID PROTEINASE)             31-MAR-95   1HSG
TITLE     CRYSTAL STRUCTURE AT 1.9 ANGSTROMS RESOLUTION OF HUMAN
TITLE    2 IMMUNODEFICIENCY VIRUS (HIV) II PROTEASE COMPLEXED WITH L-
COMPND    MOL_ID: 1;
COMPND   2 MOLECULE: HIV-1 PROTEASE;
COMPND   3 CHAIN: A, B;
COMPND   5 ENGINEERED: YES;
COMPND   6 OTHER_DETAILS: NY5 ISOLATE
SOURCE    MOL_ID: 1;
SOURCE   2 ORGANISM_SCIENTIFIC: HUMAN IMMUNODEFICIENCY VIRUS 1;
SOURCE   6 EXPRESSION_SYSTEM_TAXID: 562
KEYWDS    HYDROLASE (ACID PROTEINASE)
EXPDTA    X-RAY DIFFRACTION
AUTHOR    Z.CHEN
REVDAT   3   24-FEB-09 1HSG    1       VERSN
REVDAT   1   03-APR-96 1HSG    0
JRNL        AUTH   Z.CHEN,Y.LI,E.CHEN,D.L.HALL,P.L.DARKE,C.CULBERSON,
JRNL        TITL   CRYSTAL STRUCTURE AT 1.9-A RESOLUTION OF HUMAN
JRNL        TITL 2 IMMUNODEFICIENCY VIRUS (HIV) II PROTEASE COMPLEXED
JRNL        REF    J.BIOL.CHEM.                  V. 269 26344 1994
JRNL        PMID   7929352
REMARK   1
REMARK   3   PROGRAM     : X-PLOR
REMARK   3   AUTHORS     : BRUNGER
REMARK   3
REMARK   3  DATA USED IN REFINEMENT.
REMARK   3   RESOLUTION RANGE HIGH (ANGSTROMS) : 2.00
REMARK 800 SITE_DESCRIPTION: BINDING SITE FOR RESIDUE MK1 B 902
结构部分
DBREF: 数据库的交叉引用信息SEQRES: 形成多聚合物的线性共价相连的化学组分HET: 表述提供了坐标的非标准残基,比如辅基、抑制子、溶剂分子和离子, 第二列如MK1为hetID, 可用于在pymol中提取信息展示select name, resn hetID。FORMUL:表述非标准聚合物外其它成分的化学结构,包括水(用*表示)。 第二列如MK1为hetID, 可用于在pymol中提取信息展示select H2O, resn HOH。HELIX: 标记分子二级结构中螺旋的位置SHEET: 标记分子二级结构中片的位置SITE: 标示特殊残基,比如催化位点、辅因子、反密码子、调节位点或其它 关键位点,也可标示配体的环境信息。这个信息对我们做Docking很重要,随 后会详细描述。 [http://www.wwpdb.org/documentation/file-format-content/format33/sect7.html]CRYST1: 标示晶胞参数、空间群和Z值。这部分可能对我们设置搜索空间有帮助。 [http://www.wwpdb.org/documentation/file-format-content/format33/sect8.html]
DBREF  1HSG A    1    99  UNP    P03367   POL_HV1BR       69    167
DBREF  1HSG B    1    99  UNP    P03367   POL_HV1BR       69    167
SEQRES   1 A   99  PRO GLN ILE THR LEU TRP GLN ARG PRO LEU VAL THR ILE
SEQRES   7 A   99  PRO THR PRO VAL ASN ILE ILE GLY ARG ASN LEU LEU THR
SEQRES   8 A   99  GLN ILE GLY CYS THR LEU ASN PHE
SEQRES   1 B   99  PRO GLN ILE THR LEU TRP GLN ARG PRO LEU VAL THR ILE
SEQRES   2 B   99  LYS ILE GLY GLY GLN LEU LYS GLU ALA LEU LEU ASP THR
SEQRES   8 B   99  GLN ILE GLY CYS THR LEU ASN PHE
HET    MK1  B 902      45
HETNAM     MK1 N-[2(R)-HYDROXY-1(S)-INDANYL]-5-[(2(S)-TERTIARY
HETNAM   2 MK1  BUTYLAMINOCARBONYL)-4(3-PYRIDYLMETHYL)PIPERAZINO]-
HETNAM   3 MK1  4(S)-HYDROXY-2(R)-PHENYLMETHYLPENTANAMIDE
HETSYN     MK1 INDINAVIR
FORMUL   3  MK1    C36 H47 N5 O4
FORMUL   4  HOH   *127(H2 O)
HELIX    1   1 ARG A   87  LEU A   90  1                                   4
HELIX    2   2 ARG B   87  LEU B   90  1                                   4
SHEET    1   A 2 LEU A  10  ILE A  15  0
SHEET    2   A 2 GLN A  18  LEU A  23 -1  N  ALA A  22   O  VAL A  11
SHEET    1   B 4 VAL A  32  GLU A  34  0
SITE     1 AC1 20 ARG A   8  ASP A  25  GLY A  27  GLY A  48
SITE     2 AC1 20 GLY A  49  VAL A  82  ARG B   8  ASP B  25
SITE     3 AC1 20 GLY B  27  ALA B  28  ASP B  29  ASP B  30
SITE     4 AC1 20 VAL B  32  GLY B  48  GLY B  49  ILE B  50
SITE     5 AC1 20 PRO B  81  HOH B 308  HOH B 313  HOH B 444
CRYST1   59.570   87.070   46.710  90.00  90.00  90.00 P 21 21 2     8
ORIGX1      1.000000  0.000000  0.000000        0.00000
ORIGX2      0.000000  1.000000  0.000000        0.00000
ORIGX3      0.000000  0.000000  1.000000        0.00000
SCALE1      0.016787  0.000000  0.000000        0.00000
SCALE2      0.000000  0.011485  0.000000        0.00000
SCALE3      0.000000  0.000000  0.021409        0.00000
原子坐标
ATOM: 标记氨基酸或核苷酸的坐标,依次包含原子的标号、原子名字 (三个字符,若有第4个字符标示原子另外的构象)、残基名字、链、 残基在序列的编号(4位数,若有第5位则为残基插入)、原子的坐标(x, y, z)、 occupancy、温度、元素符号。【注:此简易描述只为简单理解PDB文件而写; 若需用程序解析PDB文件,请参照官方文档来设计程序。】TER: 标记一条链的结束。
ATOM      1  N   PRO A   1      29.361  39.686   5.862  1.00 38.10           N
ATOM      2  CA  PRO A   1      30.307  38.663   5.319  1.00 40.62           C
ATOM      3  C   PRO A   1      29.760  38.071   4.022  1.00 42.64           C
ATOM      4  O   PRO A   1      28.600  38.302   3.676  1.00 43.40           O
ATOM      5  CB  PRO A   1      30.508  37.541   6.342  1.00 37.87           C
ATOM    757  CZ  PHE A  99      20.700  32.221  -9.700  1.00 27.25           C
TER     758      PHE A  99
ATOM    759  N   PRO B   1      22.659  36.727 -10.823  1.00 48.12           N
ATOM    760  CA  PRO B   1      21.708  37.741 -10.269  1.00 43.36           C
ATOM   1513  CE1 PHE B  99      25.450  37.240   6.756  1.00 37.02           C
ATOM   1514  CE2 PHE B  99      25.473  38.988   8.409  1.00 37.11           C
ATOM   1515  CZ  PHE B  99      25.658  37.663   8.073  1.00 36.24           C
TER    1516      PHE B  99
HETATM: 测定了坐标的非聚合物或非标准分子部分,如水分子、 结合的小分子化合物。
HETATM 1517  N1  MK1 B 902       9.280  23.763   3.004  1.00 28.25           N
HETATM 1518  C1  MK1 B 902       9.498  23.983   4.459  1.00 30.30           C
HETATM 1519  C2  MK1 B 902      10.591  24.905   4.962  1.00 27.27           C
HETATM 1560  C35 MK1 B 902       4.654  23.774   4.136  1.00 49.34           C
HETATM 1561  C36 MK1 B 902       5.905  23.211   3.897  1.00 44.71           C
HETATM 1562  O   HOH A 305      20.857  43.192  21.450  1.00 63.07           O
HETATM 1563  O   HOH A 307      14.076  19.789  19.440  1.00 63.34           O
HETATM 1687  O   HOH B 613      24.127 -10.994  -0.982  1.00 64.49           O
HETATM 1688  O   HOH B 617      30.112  17.912  -4.791  1.00 54.09           O
CONECT: 标示原子之间的连接,每一列为原子的编号。主要用于HET基团 的连接。这些记录是自动生成的,也是强制性要有的。MASTER: 记录坐标的行数等信息END: 文件结尾
CONECT 1517 1518 1529 1555
CONECT 1518 1517 1519
CONECT 1519 1518 1520 1527
CONECT 1520 1519 1521 1522
CONECT 1561 1556 1560
MASTER      274    0    1    2   17    0    5    6 1686    2   45   16
END
PDBQT文件
PDBQT文件比PDB文件多两列,在原子坐标的后面增添了原子的局部电荷(partial charges)和AutoDock可以识别原子类型代码。
在利用Vinna做Docking时,受体和配体都要获得PDBQT文件,一般包含下面两部 分信息:
- 加斯泰格尔原子局部电荷
- 联合原子模型展示(包括极性氢),首先对分子加氢然后计算其局部电荷。 任何有氢键结合的非极性重原子的电荷需加上与其连接的氢的电荷,然后移 除这些氢原子。
- Gasteiger PEOE partial charges
- A united-atom representation (i.e. only polar hydrogens). A united atom representation can be obtained by first computing the partial charges for an all-hydrogen model of the molecule. Then, for each non-polar heavy atom that has any hydrogens bonded to it, the partial charge of the hydrogen should be added to that of the bonded heavy atom, then this hydrogen atom can be deleted.)
REMARK   4 XXXX COMPLIES WITH FORMAT V. 2.0
ATOM      1  N   PRO A   1      29.361  39.686   5.862  1.00 38.10    -0.038 N
ATOM      2  HN1 PRO A   1      28.682  40.038   5.187  1.00  0.00     0.280 HD
ATOM      3  HN2 PRO A   1      29.784  40.592   6.064  1.00  0.00     0.280 HD
ATOM      4  CA  PRO A   1      30.307  38.663   5.319  1.00 40.62     0.259 C
ATOM      5  C   PRO A   1      29.760  38.071   4.022  1.00 42.64     0.259 C
ATOM      6  O   PRO A   1      28.600  38.302   3.676  1.00 43.40    -0.271 OA
TER     923      PHE A  99
ATOM    923  N   PRO B   1      22.659  36.727 -10.823  1.00 48.12    -0.038 N
ATOM    924  HN1 PRO B   1      23.408  37.118 -11.394  1.00  0.00     0.280 HD
ATOM    925  HN2 PRO B   1      23.268  36.295 -10.128  1.00  0.00     0.280 HD
ATOM    926  CA  PRO B   1      21.708  37.741 -10.269  1.00 43.36     0.259 C
ATOM   1844  CZ  PHE B  99      25.658  37.663   8.073  1.00 36.24     0.000 A
TER    1845      PHE B  99
PDBQT中的原子类型
| 原子类型 | 解释 |
|---|---|
| H | Non H-bonding Hydrogen |
| HD* | Donor 1 H-bond Hydrogen |
| HS | Donor S Spherical Hydrogen |
| C* | Non H-bonding Aliphatic Carbon |
| A* | Non H-bonding Aromatic Carbon |
| N* | Non H-bonding Nitrogen |
| NA* | Acceptor 1 H-bond Nitrogen |
| NS | Acceptor S Spherical Nitrogen |
| OA* | Acceptor 2 H-bonds Oxygen |
| OS | Acceptor S Spherical Oxygen |
| F | Non H-bonding Fluorine |
| Mg | Non H-bonding Magnesium |
| MG | Non H-bonding Magnesium |
| P | Non H-bonding Phosphorus |
| SA* | Acceptor 2 H-bonds Sulphur |
| S | Non H-bonding Sulphur |
| Cl | Non H-bonding Chlorine |
| CL | Non H-bonding Chlorine |
| Ca | Non H-bonding Calcium |
| CA | Non H-bonding Calcium |
| Mn | Non H-bonding Manganese |
| MN | Non H-bonding Manganese |
| Fe | Non H-bonding Iron |
| FE | Non H-bonding Iron |
| Zn | Non H-bonding Zinc |
| ZN | Non H-bonding Zinc |
| Br | Non H-bonding Bromine |
| BR | Non H-bonding Bromine |
| I | Non H-bonding Iodine |
AutoDock中配体可以为柔性结构,使用torsion tree来代表配体中固定的和可
选择的部分。在这个树中,有一个根,多个分支,其中分支可以嵌套。每一个分
支代表一个可以选择的键。在PDBQT文件中表示如下:
ROOT记录标记分子刚性部分的起始。- 刚性root包含一个或多个PDBQT-格式的
ATOM或HETATM记录。这些记录与其在PDB文件中的含义类似, 只是在最后2列增加了电荷信息和原子类型信息。【注:这个文件的解析请见参考资料中的英文文档,此中文介绍只是为了方便理解】 ENDROOT记录标记配体刚性部分的结束。ROOT/ENDROOT原子块一般出现在PDBQT文件中的首部。如果我们想把配体的某部分作为刚性处理,则在其前后加上ROOT/ENDROOT标签即可。- 配体可选择部分包含于
BRANCH/ENDBRANCH记录中间。BRANCH和ENDBRANCH记录行包含两个空格分开的数字,代表可旋转的键连接的第一个和第二个原子的编号。BRANCH/ENDBRANCH记录中间的记录旋转键中间的ATOM/HETATM记录。另外BRANCH/ENDBRANCH记录可以嵌套。 - 配体PDBQT文件的最后一行为
TORSDOF记录。这个记录包含一个整数,代表配体自由扭转度,这一值不依赖于可旋转的键的数目,而是取决于前述记录。【注:最后半句未理解,选择直译,请参照原文理解】
REMARK  14 active torsions:
REMARK  status: ('A' for Active; 'I' for Inactive)
REMARK    1  A    between atoms: N1_1517  and  C31_1559
REMARK    2  A    between atoms: C2_1519  and  C3_1520
REMARK       I    between atoms: C3_1520  and  N2_1522
REMARK    4  A    between atoms: N3_1528  and  C10_1531
REMARK   13  A    between atoms: C23_1549  and  O4_1550
REMARK   14  A    between atoms: C31_1559  and  C32_1560
ROOT
HETATM    1  N1  MK1 B 902       9.280  23.763   3.004  1.00 28.25     0.146 N
HETATM    2  C1  MK1 B 902       9.498  23.983   4.459  1.00 30.30     0.282 C
HETATM    6  C9  MK1 B 902      10.440  23.182   2.493  1.00 27.47     0.274 C
ENDROOT
BRANCH   1   7
HETATM    7  C31 MK1 B 902       8.033  23.100   2.604  1.00 36.25     0.278 C
BRANCH   7   8
HETATM    8  C32 MK1 B 902       6.666  23.739   2.876  1.00 42.75     0.028 A
HETATM    9  C36 MK1 B 902       5.905  23.211   3.897  1.00 44.71     0.001 A
HETATM   10  C35 MK1 B 902       4.654  23.774   4.136  1.00 49.34     0.018 A
HETATM   11  C34 MK1 B 902       4.207  24.839   3.348  1.00 50.60     0.072 A
HETATM   12  N5  MK1 B 902       4.911  25.430   2.300  1.00 51.38    -0.351 N
HETATM   13  C33 MK1 B 902       6.158  24.808   2.124  1.00 47.41     0.070 A
HETATM   14  H5  MK1 B 902       4.567  26.208   1.737  1.00  0.00     0.166 HD
ENDBRANCH   7   8
ENDBRANCH   1   7
TORSDOF 14
软件安装
Windows下软件安装
- AutoDock Vina http://vina.scripps.edu/download.html,下载双击安装
- AutoDockTools http://mgltools.scripps.edu/downloads, 下载双击安装
- PyMOL http://www.pymol.org,申请教育版,双击安装
- 下载 http://sourceforge.net/projects/openbabel/files/openbabel/2.4.1/OpenBabel-2.4.1.exe/download,双击安装
Linux下软件安装
#First make sure "~/bin" is in "PATH"

#AutoDock Vina
wget http://vina.scripps.edu/download/autodock_vina_1_1_2_linux_x86.tgz
tar xvzf autodock_vina_1_1_2_linux_x86.tgz
ln -s `pwd`/autodock_vina_1_1_2_linux_x86/bin ~/bin

#AutoDockTools
wget http://mgltools.scripps.edu/downloads/downloads/tars/releases/REL1.5.6/mgltools_x86_64Linux2_1.5.6.tar.gz
tar xvzf mgltools_x86_64Linux2_1.5.6.tar.gz
(cd mgltools_x86_64Linux2_1.5.6/; ./install.sh)
ln -s `pwd`/mgltools_x86_64Linux2_1.5.6/bin/pmv ~/bin/pmv
ln -s `pwd`/mgltools_x86_64Linux2_1.5.6/bin/adt ~/bin/adt
ln -s `pwd`/mgltools_x86_64Linux2_1.5.6/bin/vision ~/bin/vision
ln -s `pwd`/mgltools_x86_64Linux2_1.5.6/bin/pythonsh ~/bin/pythonsh

ln -s `pwd`/mgltools_x86_64Linux2_1.5.6/MGLToolsPckgs/AutoDockTools/Utilities24/prepare_ligand4.py ~/bin
sed -i '1 s/python/pythonsh/' ~/bin/prepare_ligand4.py

ln -s `pwd`/mgltools_x86_64Linux2_1.5.6/MGLToolsPckgs/AutoDockTools/Utilities24/prepare_receptor4.py ~/bin
sed -i '1 s/python/pythonsh/' ~/bin/prepare_receptor4.py

#PyMOL
尚未尝试编译

#Babel
yum install openbabel-2.2.3-1.el6.x86_64
其它可用的软件
- Docking整合平台 https://sourceforge.net/projects/pyrx/
用到的文件列表
原始文件
处理后文件
- 1hsg_prot.pdb 提取的蛋白结构
- indinavir.pdb 提取的小分子结构
- 1hsg_prot.pdbqt 转换后的蛋白结构
- indinavir.pdbqt 转换后的小分子结构
- 1hsg_indinavir_dockingResult.pdbqt 上面两个分子的docking结果
- 1hsg_prot_all_h.pdbqt 转换后的蛋白结构(加所有的氢)
- 1hsg_prot_all_h.pdbqt 转换后的小分子结构(加所有的氢)
- 1hsg_indinavir_dockingResultAllH.pdbqt 上面两个分子的docking结果
- 1hsg_indinavir_original_tutorial_result.pdbqt 原始教程中docking结果
参考
- Detailed tutorial http://sbcb.bioch.ox.ac.uk/users/greg/teaching/docking-2012.html
- Detailed command line tutorial (not read yet) http://sebastianraschka.com/Articles/2014_autodock_energycomps.html#1-preparing-a-protein
- 官方文档 http://vina.scripps.edu
- PyMOL操作手册 https://pymolwiki.org/index.php/Practical_Pymol_for_Beginners
- PyMOL APBS https://pymolwiki.org/index.php/APBS
- PDBQT文件格式解释 http://autodock.scripps.edu/faqs-help/faq/what-is-the-format-of-a-pdbqt-file
- APBS使用文档http://www.poissonboltzmann.org/examples/comp_tut/
- 本文理论部分总结自http://www.docin.com/p-93380394.html
- AutoDock 4 for virtual screening http://autodock.scripps.edu/faqs-help/tutorial/using-autodock4-for-virtual-screening/UsingAutoDock4forVirtualScreening_v4.pdf
- http://blog.sina.com.cn/s/blog_602a741d01010yhk.html
- http://people.pharmacy.purdue.edu/~mlill/software/pymol_plugins/tutorial.shtml
- http://bioms.org/thread-58-1-1.html
- http://www.docin.com/p-1324133758.html
- PyMOL script https://pymolwiki.org/index.php/Displaying_Biochemical_Properties
- Hydrogen bonds http://pldserver1.biochem.queensu.ca/~rlc/work/pymol/
- Hydrogen bonds http://blog.sciencenet.cn/blog-950202-728312.html
- PyMOL中文文档 http://wenku.baidu.com/view/770dc281b52acfc788ebc949.html
- Hydrophobic surface http://www.protein.osaka-u.ac.jp/rcsfp/supracryst/suzuki/jpxtal/Katsutani/en/hydrophobicity.php
- PyMOL scripts http://rosettadesigngroup.com/blog/10/pymol-scripts/
Needed to read
- https://www.researchgate.net/post/Exact_procedure_for_autodock_result_analysis?_tpcectx=post_detail_recommendations
